Cute Bunny Penholder: A Practical 3D Printing Project for Desk Organization
In the realm of functional desktop accessories, finding a balance between aesthetic appeal and genuine utility can be challenging. The Cute Bunny Penholder represents a specific niche in the 3D printing community where character design meets organizational necessity. While the primary descriptor for this model is undeniably its high level of cuteness, evaluating it solely on appearance overlooks its value as a structured manufacturing project. For professionals, creators, and hobbyists managing a workspace, this penholder serves as both a practical storage solution and a testbed for refining additive manufacturing skills. It offers a tangible way to personalize a study or work environment while providing an opportunity to engage with multi-part assembly and variable print settings.
Functional Design and Workspace Integration
The core function of the Cute Bunny Penholder is desk organization, but its design implications go deeper than simple storage. For individuals who spend significant time studying, gaming, drawing, or managing administrative tasks, the psychological impact of workspace aesthetics is well-documented. A sterile desk can sometimes hinder creative flow or focus, whereas personalized elements can create a more inviting atmosphere. This specific model acts as a companion piece to your workflow. Unlike generic mesh cups or industrial organizers, the character-driven design introduces a softness to technical environments without sacrificing professionalism when rendered in appropriate colorways.
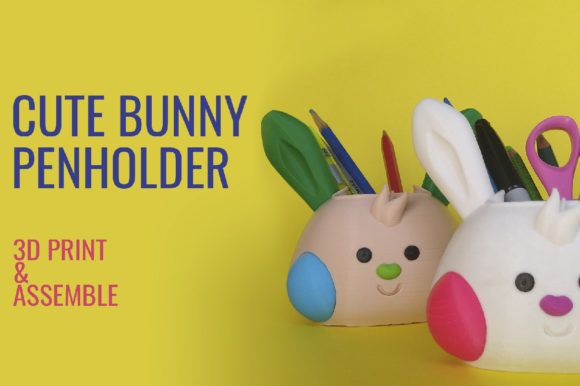
From a usability standpoint, the penholder is designed to accommodate standard writing instruments and art tools. However, its true strength lies in its modularity. The files are separated into distinct components—head, ears, cheeks, eyes, and nose—rather than a single monolithic print. This separation is not merely stylistic; it is a functional decision that allows for greater control over the final output. Users can customize the color scheme to match brand identity, room decor, or personal preference without relying on complex multi-material printing systems. Whether you choose to print each file in a specific filament color or paint the parts after assembly, the result is a bespoke item that feels intentional rather than mass-produced.
Technical Execution and Slicer Optimization
For serious hobbyists and makers, the Cute Bunny Penholder is as much about the process as the product. The creator has provided specific recommendations derived from trial and error, which adds significant value for users looking to avoid failed prints. Understanding these nuances is essential for achieving a professional-grade finish. The STL files come pre-oriented in the slicer, reflecting the optimal position for structural integrity and surface quality. This pre-configuration saves time and reduces the guesswork often associated with organic shapes.
The technical requirements vary significantly across the different components, demanding attention to detail during the slicing phase:
- Head Component: Requires 0.2mm layer height with supports activated. The geometry likely includes overhangs necessary for the pen insertion point or facial contours. Using three perimeters and 35% infill is critical here; reducing these values risks surface gaps that compromise both aesthetics and durability.
- Ears: Can be printed at 0.2mm layer height without supports. Maintaining the three-perimeter and 35% infill standard ensures the ears are rigid enough to withstand handling without snapping.
- Facial Features (Cheeks, Eyes, Nose): These smaller, detailed parts benefit immensely from a finer 0.1mm layer height. While the larger structural components tolerate standard resolution, the visual fidelity of the face depends on capturing subtle curves and expressions.
Adhering to these parameters is not optional if one desires a clean result. The warning regarding fewer perimeters and lower infill leading to surface gaps is particularly relevant for functional items. A penholder experiences regular mechanical stress as pens are inserted and removed; insufficient wall thickness will lead to premature failure. Furthermore, the included PDF documentation provides essential context that cannot be captured in the STL file alone, including specific support setups and assembly guidance. Consulting this supplementary material is a best practice that distinguishes successful builds from frustrating failures.
Assembly Workflow and Customization Potential
One of the most practical aspects of the Cute Bunny Penholder is its accessible assembly process. Multi-part 3D prints can sometimes require extensive post-processing, sanding, or chemical welding to fit together correctly. However, this model is engineered for intuitive assembly, making it suitable even for those new to character modeling. The tolerances appear calibrated for standard FDM printers, though users should always verify fitment before committing to final adhesives.
The customization potential extends beyond color. Because the files are modular, advanced users can modify individual components before printing. For example, a marketer might adjust the ear geometry to hold business cards, or an educator might scale the head slightly to accommodate thicker markers. The ability to paint the model after assembly also opens doors for mixed-media finishing techniques. Primer, acrylic paints, and clear coats can transform the layered plastic texture into a smooth, ceramic-like finish, elevating the object from a 3D print to a crafted desk accessory. This flexibility makes the project scalable in terms of effort; a quick functional print takes a few hours, while a showpiece can be a weekend refinement project.
Evaluating Long-Term Value and Audience Fit
Who benefits most from downloading and printing the Cute Bunny Penholder? The audience extends beyond casual enthusiasts. Freelancers and content creators who frequently appear on camera may find it serves as excellent set dressing, adding personality to video backgrounds without being distracting. Educators and tutors working with younger demographics can use it as a friendly visual anchor during remote lessons. Small business owners might utilize customized versions as branded merchandise or client gifts, provided they adhere to the licensing terms of the original designer.
However, prospective users should maintain realistic expectations. As an FDM-printed object, layer lines will be visible, particularly on the curved surfaces of the head and cheeks. While the 0.1mm recommendation for facial features mitigates this, achieving an injection-molded smoothness requires significant post-processing time. Additionally, the reliance on supports for the head means there will be scarring on contact points that may need sanding. Users prioritizing speed over aesthetics may find the multi-part assembly and variable settings tedious compared to a single-cup print.
Despite these considerations, the long-term value proposition remains strong. The Cute Bunny Penholder is a reusable digital asset. Once the initial tuning is complete for your specific printer and filament type, producing additional units becomes efficient. The skills practiced during this build—managing supports for organic shapes, optimizing perimeters for strength, and assembling multi-part models—are directly transferable to more complex engineering or artistic projects. It functions as a benchmark for printer calibration and a reliable source of desk organization.
Practical Recommendations for Success
To maximize the effectiveness of this project, consider the following professional observations:
- Material Selection Matters: Matte PLA or silk filaments tend to hide layer lines better than glossy standard PLA, reducing the need for post-processing on the head and ears. For the facial features, a consistent color matte filament ensures the expression reads clearly.
- Verify Tolerances First: Before printing all parts at high quality, print a low-resolution test of the connection points. If your printer runs hot or cool, you may need to apply a horizontal expansion offset in your slicer to ensure the ears and face insert snugly into the head.
- Respect the Documentation: The included PDF is not an afterthought; it contains the institutional knowledge of the designer’s testing phase. Ignoring the specific setup guidance for supports is the most common cause of poor results with this model.
- Plan Your Post-Processing: If you intend to paint, plan your support placement to minimize contact on visible front-facing surfaces. Orienting the head specifically to push support scars to the back or bottom interior will save hours of finishing work.
Ultimately, the Cute Bunny Penholder succeeds because it respects the user's intelligence and time. It provides a charming, functional outcome while acknowledging the technical realities of 3D printing. By following the recommended settings and leveraging the modularity of the design, users can create a desk accessory that is genuinely cute, structurally sound, and personally meaningful. Whether used to organize a professional drafting table or simply to bring a moment of joy to a study session, it stands as a testament to the versatility of modern desktop fabrication.