Mastering the 3D Bee SVG File and Layered Honeycomb Laser Design
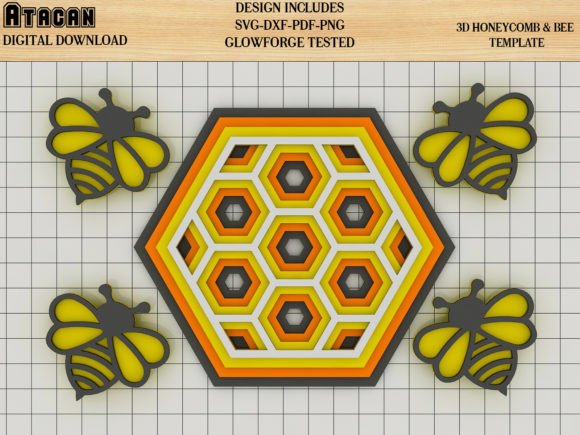
Creating dimensional art with a laser cutter or digital die-cutting machine offers a satisfying tactile experience that flat printing simply cannot match. The 3D Bee SVG File, Layered Honeycomb Laser design has become a staple for makers because it bridges the gap between simple engraving and complex assembly. This specific file type allows you to build a multi-layered insect set against an intricate geometric background, creating depth and shadow play that catches the eye. Whether you are producing nursery decor, educational biology models, or unique greeting cards, understanding the nuances of this layered format is essential for professional results.
However, many crafters approach these files with assumptions that lead to wasted material and frustration. A layered design is not just a picture cut into pieces; it is an engineered stack where tolerance, material thickness, and software settings must align perfectly. By addressing common pitfalls early, you can transform a potentially frustrating project into a streamlined production process.
Understanding Material Thickness Tolerances
The most frequent error when working with the 3D Bee SVG File, Layered Honeycomb Laser involves ignoring material variance. Digital files are mathematically perfect, but physical materials are not. Cardstock, basswood, and acrylic all have manufacturing tolerances. If your design calls for 1/8-inch wood but your actual stock measures 0.120 inches, those fractions of a millimeter compound across multiple layers. The result is often a bee body that sits too high above the honeycomb or legs that fail to seat properly in their designated slots.
To avoid this, always measure your specific batch of material with digital calipers before cutting. Do not rely on the nominal thickness listed on the packaging. If you find a discrepancy, adjust your kerf compensation or slot width in your vector editing software before sending the job to the machine. For paper craft machines like Cricut or Silhouette, ensure your blade depth is calibrated specifically for the weight of cardstock you are using. A blade that cuts too deep will score the mat and ruin alignment, while one that is too shallow will leave fibers connected, making clean layering impossible.
Selecting the Correct Vector Format for Your Machine
This design package includes DXF, SVG, PDF, AI, and CDR files, yet users often default to whatever format opens first rather than what is optimal for their hardware. While JPG files are included, they are strictly for reference and should never be used for cutting. Raster images lack the mathematical path data required for precise blade or laser movement, leading to jagged edges and sizing errors.
- SVG: Best for Glowforge, Cricut Design Space, and Silhouette Studio. These files retain layer information and scaling without quality loss.
- DXF: Ideal for older versions of Silhouette Studio (Basic Edition) and certain CAD-based laser software. Note that DXF sometimes loses fill colors, so layers may need to be reassigned by line color.
- AI/CDR: Preferred for professional Adobe Illustrator or CorelDRAW workflows where you intend to modify the geometry extensively before cutting.
- PDF: Useful for print-then-cut applications or as a backup vector source if other formats corrupt during transfer.
Using the wrong format can strip away crucial grouping data. If your bee wings separate from the body or the honeycomb cells ungroup unexpectedly, switch formats. Testing with a small section of the design in your preferred file type saves hours of reassembly time later.
Managing Kerf and Fit for Interlocking Parts
Laser cutting removes material. This removed width, known as kerf, creates gaps in interlocking designs. The 3D Bee SVG File, Layered Honeycomb Laser was tested on a Glowforge Pro, which has a specific kerf profile. If you are using a diode laser, CO2 tube laser with different optics, or a blade cutter, the fit will differ. Diode lasers typically have a wider kerf than CO2 lasers, potentially making press-fit parts loose. Conversely, blade cutters compress material rather than vaporizing it, which can make slots tighter than intended.
Before committing to expensive hardwood or premium cardstock, perform a fit test using scrap material of identical thickness. Cut only the smallest interlocking components, such as a single bee leg and its corresponding body slot. Assemble them to check friction. They should hold together with gentle pressure without requiring excessive force that could snap delicate parts. If the fit is too loose, reduce the slot size in your software by half the measured gap. If too tight, increase the slot size. This calibration step is non-negotiable for professional-quality output.
Color Coding and Layer Organization
Layered designs rely on visual hierarchy. A common oversight is failing to verify layer order after importing the file. Software updates or format conversions can sometimes invert stack order, placing the background honeycomb on top of the foreground bee elements. This renders the 3D effect useless and requires manual re-sorting.
Always review the layer panel immediately upon import. Ensure the honeycomb base is at the bottom, followed by spacer layers (if applicable), then the bee body, and finally the wings or antennae. Many designers use color coding to indicate cut order or material changes. Verify that these colors correspond correctly to your machine’s processing rules. For example, if red lines indicate engraving and blue lines indicate cutting, confirm your software hasn't swapped these assignments. Taking thirty seconds to validate the stack prevents burning through finished layers or cutting structural supports out of sequence.
Adhesive Selection and Assembly Strategy
The physical construction phase introduces variables that digital files cannot control. Using the wrong adhesive is a primary cause of project failure. Standard liquid glues contain water that warps paper and cardstock, causing the honeycomb pattern to buckle. Hot glue adds bulk that prevents flush seating between layers. For paper crafts, double-sided tape sheets or precision glue pens offer control without moisture damage. For wood or acrylic, cyanoacrylate (CA) glue or specialized laser-safe adhesives provide instant bonds without warping.
Assembly order matters as much as adhesive choice. Work from the bottom up on a flat, protected surface. Align each layer carefully before applying permanent adhesive. For complex honeycomb backgrounds, consider using registration marks or temporary pins to maintain alignment during the gluing process. Rushing assembly leads to misaligned layers that cast unintended shadows, diminishing the intended 3D aesthetic. Patience during construction honors the precision of the original digital design.
Verifying Machine Compatibility Beyond Brand Names
While this 3D Bee SVG File, Layered Honeycomb Laser is compatible with Cricut, Cameo, Silhouette, Sizzix, Brother, Gemini, and Glowforge machines, compatibility extends beyond brand recognition. It encompasses bed size, maximum material thickness, and software capabilities. A design tested on a Glowforge Pro’s expansive bed may require tiling or resizing for smaller-format machines. Similarly, machines with lower wattage may struggle to cut through thicker materials needed for substantial 3D effects without charring edges.
Check your machine’s specifications against the design requirements before purchasing or downloading. If your machine has a smaller work area, plan how you will tile the honeycomb background or scale the bee proportionally. Ensure your software supports the necessary operations; some basic editions cannot handle complex boolean operations or nested groups found in advanced 3D files. Understanding your equipment’s true limitations allows you to adapt the design successfully rather than forcing it into an incompatible workflow.
Success with layered laser and cutter files comes from respecting both the digital precision and physical realities of your materials. By validating formats, testing tolerances, verifying layer organization, and choosing appropriate assembly methods, you ensure that the 3D Bee SVG File, Layered Honeycomb Laser delivers the stunning dimensional results you envision. Each correction applied upfront translates directly to higher quality, less waste, and greater creative satisfaction in your final product.